About Our Company
How does Smart Print Work
Smart Print is a document transport system allowing documents to be electronically sent from any remote location to any Smart Print printer in the Smart Print global network. Documents are first converted to PostScript, a universal print language, using a Postscript Smart Print print driver. The PostScript, along with the document features, such as Duplexing, Color and B&W, is sent to the Central SmartPrint servers hosted in the SmartPrint network operations center. These servers dispatch the print jobs out into the global network to the printer requested by the end user.
 |
From your Windows desktop application you can simply select File and then Print from the application’s menu. This will send your document to the Adobe PostScript Printer Driver. After the document has “spooled” to the printer, the SmartPrint E-Ticket will appear. Always remember to save your document before you print it. |
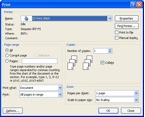 |
When the windows print screen comes up simply select “OK” to go to the SmartPrint E-Ticket. Leave the number of copies set to 1. The number of copies to be printed will be entered on the E-Ticket. |
 |
When the E-Ticket appears go through the location tree and find the location of the printer that where the document should be sent. |
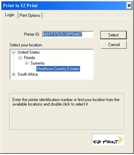 |
Once the location is found and highlighted, the user will press the select button to go to the next screen. As the global network grows, this screen will automatically add the new locations for selection. The user will never have to install updates to the print driver because all information is automatically updated when the driver is initiated. |
 |
After selecting the print location you will be presented with the print screen. If this is the first time the user has used SmartPrint they must select the payment tab. |
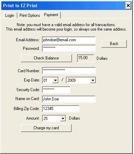 |
The payment screen will allow the user to enter credit card information and select a user name and password. The user name will always be the user’s email address. The user can select payment amounts of $5, $10 $20, $25 $50, or $100. Once the payment is accepted the amount selected will be added to the users account and associated with their email address and password. The transaction will occur over a secure encrypted connection to insure the user’s safety. The user can now print jobs until the credit in the account is exhausted. |
 |
Once a user has credit in their account they will be able to select the options for their print job. On the print screen the number of copies, color, B&W and finishing options can be selected. When the user selects the options the cost of the print job will be updated to reflect the charges for the number of pages and options selected. |
 |
After the print options are selected and “OK” is pressed, the user will be presented with a password screen to confirm the transaction before deduction credit from the user’s account and sending the print job. |
 |
After confirming the print job a progress box will be presented. |
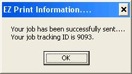 |
When the document has been successfully sent the user will receive confirmation and a document tracking number. If an error message appears or the user do not receive a tracking number, the document was not successfully sent |
 |
Now the user is done. The print job comes out of the printer. |